1. Introduction
As optical systems become more complex and packaging requirements more severe and multi-dimensional, proper alignment becomes more challenging. Yet with current improvements in the manufacture and measurement of optical surfaces to nm levels, alignment is one of the few remaining opto-mechanical aspects of optical system manufacture and assembly where improvement in optical performance can be made. There are four approaches to aligning optical systems. These will be described and the advocated method illustrated by examples.
The preferred alignment method overcomes most of the difficulties of traditional methods but requires a new way of thinking about alignment. The method also requires alignment considerations must be studied immediately after the optical design is complete so that the necessary opto-mechanical datums can be incorporated into the mechanical design of the optical system cell, chassis or lens bench.
2. Methods of alignment
While one could argue with these definitions of alignment methods, they illustrate the point to be made. First is “snap together” or drop the elements into a cell which is the method traditionally used from the beginnings of centered optical systems. A cell and lenses are manufactured to tolerances governed by cost and performance considerations and then the lenses are set in the cell against their seats and held down by retainers. One then lives with the assembled performance of the system that is well modeled by Monte Carlo analysis. Since there will be a spectrum of performance outcomes in keeping with the model, optimum system performance will be achieved in only a few of these systems. However, this is the only economical method of assembling large volumes of optical systems.
Another method used on limited quantity, high performance, high cost systems is to assemble lenses into their seats while measuring each lens at its periphery for centration and vertex for spacing, and then testing the performance against a go/no go standard. If the performance falls below the acceptance criteria, the system is taken apart and reassembled as carefully as possible according to the design and tested again. This is a very tedious and costly procedure that exposes the optical components to many sources of damage through dis- and re-assembly.
A third method is a more systematic approach similar to the second but where the performance of the system is measured quantitatively in the pupil plane, possibly at a number of field points. If the system does not perform to an acceptable level optical design software is used to figure out what spacings and misalignments are causing the less than optimum performance, these adjustments are made and the system is tested again. Sometimes a second round of adjustments is necessary as changes in alignment affect performance non-linearly. While this method is more systematic it is still tedious and requires substantial careful testing and analysis of the test results.
The fourth method that this paper advocates for high end, modest production systems is to locate the centers of curvature of each powered optical element at the exact design nominal location, or “true position” in mechanical engineering terms, and each plane mirror tilted and spaced so the beam focuses at the design nominal position after the fold. For centered systems this is most easily done by centering a datum seat in the cell on a rotary table and then checking that the light from the centers (or apparent centers) of curvature of the elements as they are assembled, one by one, do not nutate as the table is rotated as shown in Fig. 1.
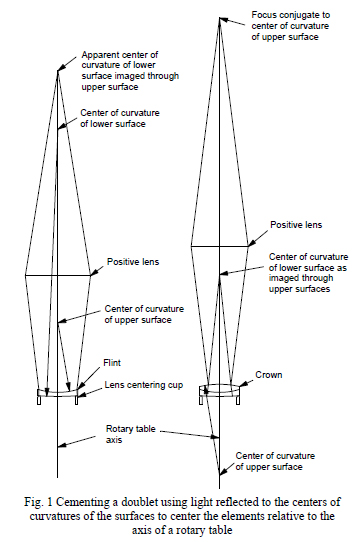
This example shows the cementing of a double where the flint element is placed in a centering cup and the cup centered until the reflection of a point source of light conjugate to the convex surface center of curvature (C of C) does not nutate. An auxiliary positive lens is needed to reach the apparent C of C but its focal length is not critical. The flint is then slid in the cup about the convex surface until the reflection of a point source of light at the C of C of the concave side remains still. The flint is then considered centered meaning that the line joining the centers of curvature of the two surfaces (the optical axis) is coincident with the axis of the rotary table. Then the lens is lightly clamped.
A drop of cement is placed in the concave well of the flint and the crown element is set in place. The concave surface of the flint now acts as an aligned centering cup so all that is needed is to make the reflection from the upper crown convex surface remain stationary. Again an auxiliary positive lens is required to access the C of C of the crown. The right hand side of Fig. 1 also shows how the apparent C of C of the flint has moved toward the lens due to the refraction of the crown.
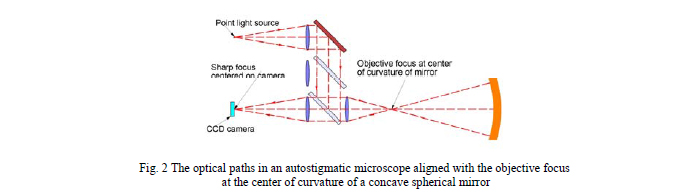
In this example we have referred to placing a point source of light at the C of C of a surface and then watching the behavior of the reflected image. The best way of doing this is with an autostigmatic microscope (ASM), a reflecting microscope with a beamsplitter behind objective and a point source of light produced by a single mode fiber located at the long conjugate of the objective. The return image can be viewed through an eyepiece or via a CCD camera. Fig. 2 shows a schematic illustration of the optical paths in a commercially available autostigmatic microscope.1
3. Aligning two and three dimensional systems
Centered systems are a trivial case of locating C of C’s according to an optical design. Of far greater interest are two and three dimensional systems where the chief ray moves over a plane or in three dimensions. Since three dimensional systems are difficult to diagram successfully on paper, a two dimensional example will be given that amply illustrates the three dimensional nature of the problem. An imaging spectrometer from US Patent 6,288,781 by D. R. Lobb with powered prismatic elements is shown to scale in Fig. 3. Light enters a slit on the face of a plane prism at the upper left of Fig. 3. It passes through a prism with power on both the entrance and exit faces and proceeds on to an arrangement of three spherical mirrors similar to an Offner relay. The light exits through another prism with power on both surfaces to the detector plane.
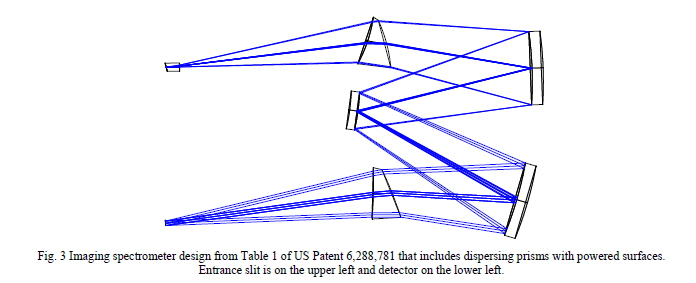
Fig. 4 shows the spectrometer in perspective and traces the chief ray from the entrance slit through the system to the middle of the detector plane. The line joining the entrance slit and detector plane is the axis of the spectrometer in an alignment, or opto-mechanical, sense just as the optical axis of a single refractive element is the line joining the C’s of C of the two surfaces. This axis defines five degrees of freedom of the spectrometer, three translations and two angles. We define the sixth degree of freedom in that we want the centers of all the elements to be the same height above a mounting plane.
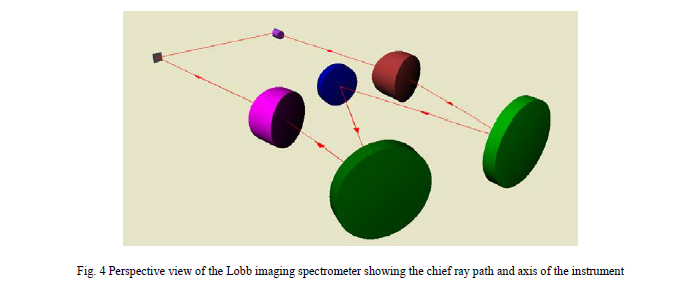
It is obvious that the edging tolerances and mount fabrication for the dispersing elements is going to be difficult as they will have to be located precisely and unambiguously in all six degrees of freedom relative to the spectrometer axis as defined by the slits. Of course the three mirrors also have to be properly aligned but this is a relatively simple matter compared to the prisms.
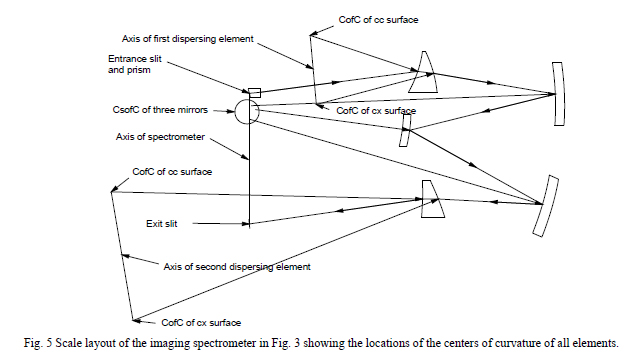
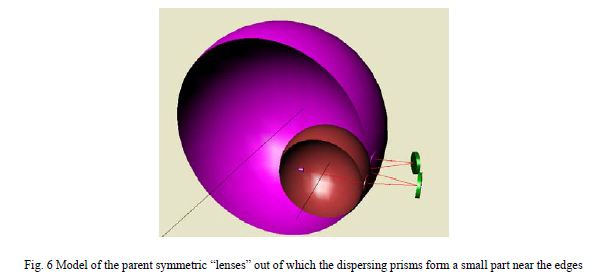
In order to accomplish this alignment we suggest that the next diagram to draw is the one in Fig. 5 where the C’s of C and axes of all the elements are located relative to the entrance slit and center of the detector, all in the plane of the paper. The centers of curvature of the three Offner relay mirrors are clustered together between the entrance and exits slits. Because the two centers of curvature of the dispersive elements each define three degrees of freedom, all six are defined for each element so they may be located precisely and unambiguously without reference to their edges. To illustrate where the dispersive elements lie relative to their axes we show the full elements in Fig. 6. This also illustrates why these elements would be difficult to fabricate without understanding their geometry. Once the geometry is understood the generating and polishing of the surfaces is not much more difficult than the surfaces of any lens.
4. Alignment of the system
In order to align the system a fixture is made either by drilling holes in the optical bench to which the elements of the spectrometer are mounted or in a fixture to which the optical bench is located by pins. In the holes a precision rod is placed with a conical hole in the upper end to serve as a mount for a bearing ball about 10 mm in diameter. A collar on the rod is used to locate the center of the ball to the height of the plane of centers of curvature. The rod and ball can be moved from hole to hole as one element is aligned after the other.
For the three convex surfaces, an auxiliary positive lens is needed to make the C’s of C accessible as already illustrated in Fig. 1. Holes and rods are also needed to support these auxiliary lenses but their locations need not be very precise as long as the lenses are centered on a normal to the convex surface that is roughly in the center of the surface.
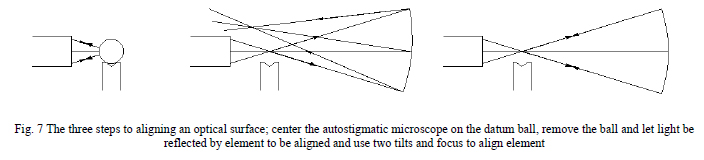
The short conjugate of the objective of an autostigmatic microscope is focused and centered on the center of the ball defining the C of C and pointing toward the element of interest. The ball is removed and the element adjusted until its center of curvature is focused and centered on the autostigmatic microscope display. Fig. 7 illustrates first aligning the autostigmatic microscope to the ball that defines the mechanical location of the C of C, removing the ball and aligning the mirror to the microscope. The microscope acts as the transfer device between the mechanical datum at the C of C and the optical surface. In the case of the refractive elements, having two microscopes makes this procedure much easier because both centers of curvature can be viewed simultaneously, one through the auxiliary lens. The order of alignment is governed only by avoiding the obstruction of the line of sight to the next surface.
When the alignment is complete a point source placed at the entrance slit will be well imaged at the detector. There can be no source of error unless the radii of the elements are substantially out of spec or the wrong glass was used. Since a good autostigmatic microscope can locate centers of curvature to < 1 μm, the translational errors of element locations can be held to about the same level and angular errors to a few seconds of arc (although the scale of the angular error will scale with the system size). The alignment is completely deterministic and does not depend on the type of optical system or even any knowledge of how the system will form an image because light is never put through the system the way it will be used during the alignment.
Alignment of folded systems with plane mirrors
Fold mirrors are plane mirrors used to change the direction of a beam of light and are useful in systems that must be made compact. If a light beam is focused it is defined by three degrees of freedom, the x,y,z coordinates of the focus. Since a plane is also defined by three points we have just enough degrees of freedom with two angles and one translation to change the beam direction and keep the distance from the last powered element to the focus constant. This does not count the two translational degrees of freedom needed to keep the beam centered on the plane mirror but these are not critical adjustments.
While we have been talking about folded systems the example we will use to illustrate the alignment of the plane mirrors was chosen to illustrate not only this section but the next concerning using aberration reduction as an alignment tool. Assume we want to put a deformable plane mirror in a telescope system for atmospheric error correction. This amounts to taking the beam of light coming toward the telescope focal plane and diverting it into a black box that corrects the wavefront and then spits the light back out so it focuses in the same place on the focal plane as it would have without the correction system. Whether the black box is in the system or not should be invisible to the detector. How do we align the fold mirrors to get the light in and out of the black box? A generic adaptive optical system (AOS) is shown in Fig. 8.
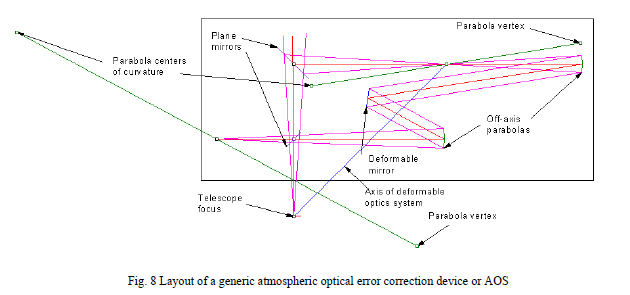
The AOS consists of a fold mirror to bend the beam headed toward the telescope focus to the entrance focus of the AOS, an off-axis parabola to collimate the beam, a deformable mirror to correct the wavefront, a second off-axis parabola to re-focus the beam and a final plane mirror to direct the output of the AOS to the telescope focus. If the whole optical bench were moved out of the way the focal plane would be none the wiser except the AOS decreases the f/number of the final beam somewhat. Just as in the imaging spectrometer we have identified an axis of the system with the sixth degree of freedom being the arbitrary angle about the axis.
For alignment purposes, the two plane mirrors must be precisely located so that the AOS does not appear to be in the telescope at all. To do this we first place a concave spherical mirror beyond the first fold mirror (mirror at top of Fig. 9) aligned so its center of curvature coincides with the telescope focus using an autostigmatic microscope (ASM) or similar device. Then we move the ASM so that it is focused at the center of the ball locating the exit focus of the AOS and is pointing toward the right. A second concave sphere is aligned to the microscope in tilt and focus.
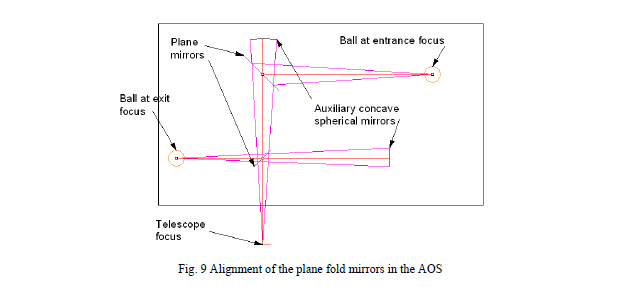
Then the microscope is moved back to the telescope focus as now defined by the concave sphere at the top and the plane mirror that folds the beam downward is inserted and adjusted in tilt and translation normal to its surface until the reflection from the concave sphere to the right is aligned on itself in the microscope. Now the microscope is focused on the ball at the entrance focus and is set to point toward the left. The entrance plane mirror is inserted and adjusted in three degrees of freedom until the return image from the concave mirror at the top is re-imaged on itself in tilt and focus. Now the plane mirrors are aligned to the telescope focus and the entrance and exit foci of the AOS. It now remains to align the powered optics of the AOS to the entrance and exit foci.
One aspect of this is to note that the alignment steps must be ordered so that no previously aligned optic interferes with the light path to another optic that needs aligning. This is why we had to use two concave spheres as tooling to align the two plane mirrors. Another aspect to note is that if the distances from the mirror to the foci are not equal it will not be possible to adjust the fold mirror so the chief ray follows the angle given in the design but will be incorrect by some angle dependent on the error in distances. This could come about in the design in Fig. 8 if the lens bench were incorrectly located too close or far from the focal plane. Then the exit fold mirror could still be adjusted so the output focus fell on the telescope focus but the chief ray of the AOS output would not be parallel to the chief ray from the telescope. In most cases a small error will not matter but it is something to be aware of.
Alignment using aberrations
Alignment using aberrations is very useful for locating optical elements with axes, particularly aspheric mirrors either symmetric or off-axis. While we will return to the AOS example momentarily, we give an example of where alignment using aberrations is sometimes seen in optical fabrication shops. The optician will want to test an objective lens with an interferometer for the transmitted wavefront quality. The test is so obvious that many fail to realize how sensitive the test can be to aberrations in the field and are surprised to see astigmatism and/or coma.
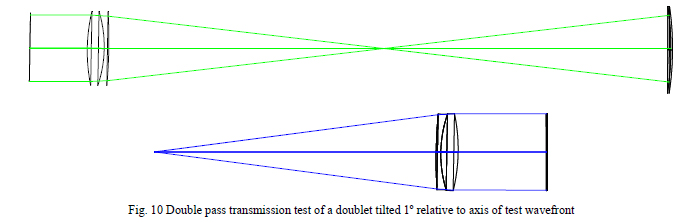
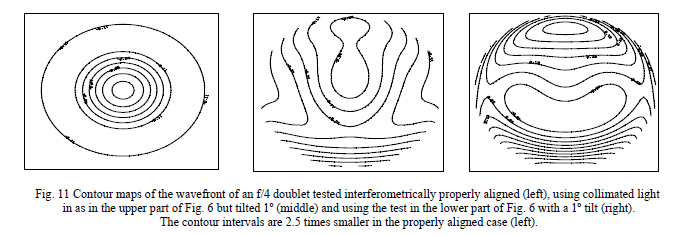
As an example, take a 25 mm diameter, f/4 cemented doublet. It can be tested interferometrically in either of two ways, collimated light in or focused light in against a flat, as shown in Fig. 10. Although it is not obvious without very careful examination the doublet is tilted 1º about an axis perpendicular to the page relative to the collimated beam from the interferometer (upper) or the return plane mirror (lower). Yet this misalignment that is not obvious without taking great care in the set up of the test yields substantial transmitted wavefront error that is not intrinsic to the doublet but rather due to its incorrect test. Contour maps of the wavefront aberrations are shown in Fig. 11.
This example is a simple demonstration of the importance of proper alignment to achieve full optical system design performance. Small alignment errors can have disastrous consequences on system performance yet be imperceptible without careful monitoring. This leads to the more interesting example of using aberrations for alignment. We will examine two cases, the alignment of a symmetric parabola to a flat (or collimated source) and the same example with an off-axis parabola to show there is fundamentally no difference in the approach.
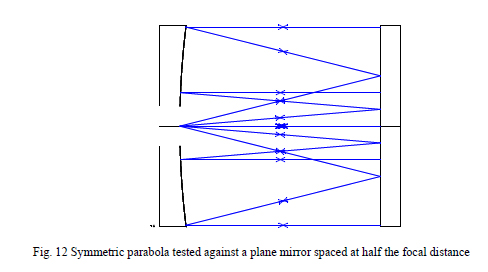
Assume we have a symmetric parabola with a central hole for the light to pass through. In this case a common test is to locate the test device focus at the mechanical center of the hole, let the out going light reflect off a flat placed at approximately half the focal distance from the parabola so the light fills the parabola and reflects back to the flat nearly collimated as shown in Fig. 12. The light then retraces itself back to the source when everything is aligned. The optical axis of the test setup is the line joining object and image and this we have located as soon as the image lies on top of the object, something easily seen with an ASM or when there are no tilt fringes in an interferometer.
The optical axis of the test set up must be aligned to the optical axis of the parabola for there to be no aberrations. The first step is to move the plane mirror longitudinally to focus the image and tilt the plane mirror until the object and image are coincident. If there is no coma then the parabola is perfectly aligned to the flat. In general this will not be the case. To finish the alignment the ASM focus (or the parabola) must be decentered in a direction to reduce the coma while the flat is tilted to keep object and image coincident. Moving the microscope in the direction of the point of the coma pattern will decrease the coma. Continue the decentering until the image is symmetrical. The location of the focus defines three degrees of freedom while the two tilts of the flat make up the balance of the five degrees of freedom needed for proper alignment. In this example with a 50 mm diameter, f/2 parabola just 23 μm of decenter (equivalent to 23 seconds in the field) will produce 0.1 waves of coma. This may be acceptable for viewing stars but is totally unacceptable for doing lithography.
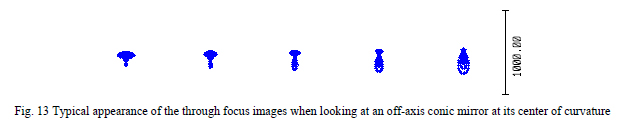
Going back now to the AOS where we talked about the positioning of the fold mirrors, there are also two off-axis parabolas that need aligning, see Fig. 8. The location of the focus of each has already been used in the fold mirror alignment. The vertices and C of C’s of these mirrors is also indicated in the Figure. If there is no indication of where the optical axis is on the off-axis mirrors the best approach is to put an ASM at the design location of the C of C of one of the mirrors and adjust the mirror to return the light into the ASM objective. As the mirror is moved longitudinally the combination of astigmatism and coma will produce an image that looks somewhat like a fish as shown in Fig. 13. The tail of the fish points toward the vertex of the off-axis segment.
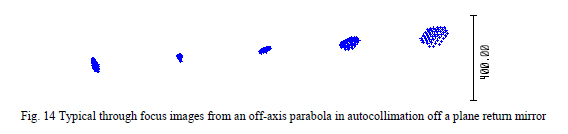
Once the off-axis mirror is located approximately correctly based on the location of its C of C an ASM is located at the design location of its focus and a plane mirror is used to reflect the nearly collimated light back into the off-axis mirror and ASM objective. The plane mirror should be used exclusively to get the light back into the ASM objective and centered on the display. Typical images might look like the through focus images in Fig. 14.
Adjustments should be made simultaneously to the off-axis parabola and the plane mirror to hold the image centered in the ASM and to orient the largely astigmatic image with the coordinate system, that is, make the astigmatism either horizontal or vertical. Once this is done tilt and decenter of the off-axis parabola and tilt of the mirror are only needed in one direction to shrink the image to a symmetrical, well focused image.2 As the image approaches symmetry it may be necessary to touch up the alignment in the other direction as the astigmatism may rotate as the image symmetry and focus improve due to better alignment.
For the final example5 we take the single pass alignment of a convex secondary in an off-axis Ritchey-Chretien telescope as shown in Fig. 15. In this case we had already aligned the primary mirror and had collimated light entering the telescope parallel with the primary optical axis. The design indicated precisely where the system should focus relative to the primary vertex. The line between the primary focus and the system focus defined the optical axis of the telescope. The secondary axis had to be aligned to this axis in five degrees of freedom to eliminate any aberrations.
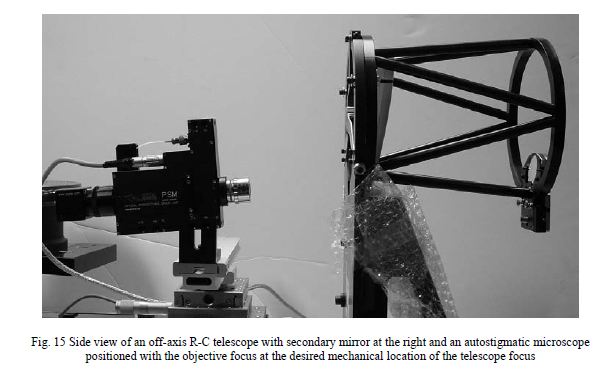
With collimated light entering from the right in Fig. 15 the primary and secondary mirrors brought the light to focus in the vicinity of the autostigmatic microscope objective focus. The microscope objective focus had been located via mechanical tooling (see Fig. 7) and does not move once located mechanically. The secondary is then adjusted in focus and either tilt or decenter until the focused light enters the objective and the badly aberrated spot is roughly centered on the viewing screen. When reasonably well focused light is centered in the microscope objective the secondary has been adjusted in three of the five necessary degrees of freedom.
It is then necessary to use a combination of tilt and decenter plus focus to hold the focused spot centered in the objective and to reduce the aberrations, now a combination of focus, astigmatism and coma. The procedure is exactly as described previously above. If the secondary mirror has five adjustment screws and a minimum of backlash it is possible to do the alignment in a matter of minutes.
Determining aberrations from images
It has been suggested that the alignment described in the above sections of the papers can be performed with an ASM or an interferometer. Except for one embodiment of a commercial interferometer (Fisba), interferometers are too large to conveniently adjust accurately and stably in five degrees of freedom, three degrees of translation with high resolution and two degrees of tilt to be sure apertures are approximately uniformly filled with light. Not only is an ASM easier to move conveniently and accurately adjust to the locations necessary for alignment, but the adjustments needed on the optics being aligned are easier to interpret from the image shapes than from interference fringes. Granted that low order aberration quantities can be read off the interferometer monitor and these used to guide adjustments, the hand/eye human interface using the image shapes tend to be more efficient. The only downside to using the image is that it doesn’t give quantitative results as to the aberrations although an ASM is sensitive to wavefront errors of less that λ/8. In this last section we will describe a simple means of extracting pseudo low order aberration content from the images viewed with an ASM.
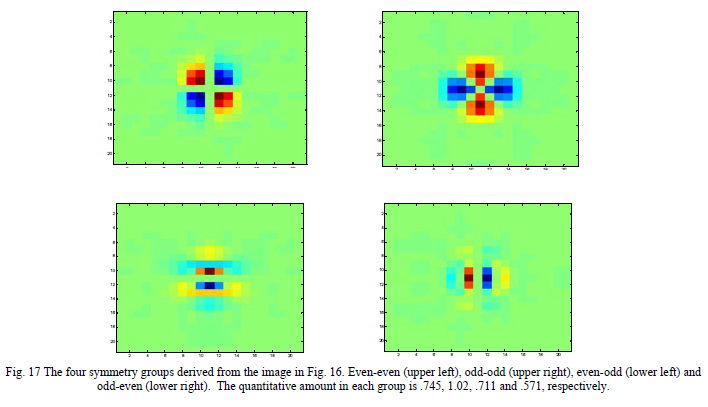
Two dimensional images have five symmetries; there is a part of the image that does not vary with azimuth and this part corresponds to all the rotationally symmetric parts of an image such as focus, third order spherical and all the higher order spherical aberrations. There remain four symmetries that describe how the image changes when it is flipped left-to-right, top-to-bottom and both left-right and top-bottom3,4. These are even-even and correspond to 3rd order and higher astigmatisms at 0º, odd-odd that are related to astigmatism at 45º, odd-even that are related to 3rd order and higher comas at 0º and even-odd relating to comas at 90 º.
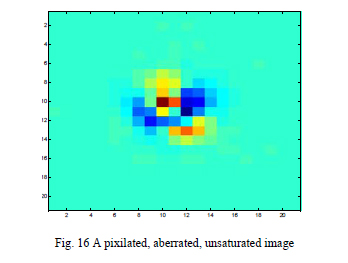
As an example take the image in Fig.16 where the pixels are 4.5 μm square and the image was magnified by a factor of 5 by the ASM. Because the region of interest around the image comprises relatively few pixels it is a quick calculation to find the even-even part of the image and then extract the rotationally symmetric part from that.
Once the rotationally symmetric part of the image is removed the image is further processed simply by flipping and adding or subtracting the flipped images to make four linear combinations of the original to form the four symmetry groups. Fig. 17 shows the four symmetries derived from the image in Fig. 16 after the rotationally symmetric part was removed. As is clear the four images bear a close resemblance to the two orientations of astigmatism and the two orientations of coma. While there are probably a number of ways to derive quantitative information on how big the proportions are of each symmetry type, we simply used the root sum square of the values at each pixel as the criterion.
Now as the alignment of an optical system becomes relatively good the pseudo aberrations derived from the symmetry of the image can be used to help determine the final adjustments of the alignment. Notice that this approach does not carry a sign for the pseudo aberration; all that can be done is to minimize each of the four aberrations. Also, some of the symmetry in the image will depend on how uniformly the pupil of the system is illuminated. Care should be exercised to make sure the ASM axis is well centered on the pupil of the system being aligned. The simplicity of the calculations makes it possible to update the results at TV frame rates.
5. Conclusions
The method of alignment by locating centers of curvature is a strictly deterministic approach to alignment that is particularly helpful for complex, folded and off-axis optical systems. Further, the method does not impose tight (read costly) tolerances on edging or mounts. The same principles can be applied to the alignment of plane, fold mirrors. Finally, using aberrations is an easy way of aligning aspheric optics. It is not presently widely used because the instrument to determine the aberrations is usually an interferometer and they are generally too large to bring to the optics in question. The ideal device to view images is an autostigmatic microscope and, until recently, there have been no commercial sources for these. Because the commercial ASM’s include software as an integral part of the instrument it is not difficult to derive quantitative values for the pseudo aberrations most useful for alignment.
If planning for this deterministic alignment method is incorporated in the opto-mechanical design of optical systems immediately following the lens design itself there need be no further acknowledgements such as the one that appeared in a recent paper about the design, fabrication and assembly of the ARIES imaging spectrometer used on the 6.5 m Multiple Mirror Telescope6, namely, “Thanks, Koby Smith, for banging your head against the wall to align the thing.” If alignment is approached in a logical and systematic manner as part of the opto-mechanical design from the outset of a project there is no need for anyone to bang their head against a wall.
6. References
1R. E. Parks and W. P. Kuhn, “Optical alignment using the Point Source Microscope”, Proc. SPIE, 58770B, (2005).
2R. E. Parks, “Alignment of off-axis conic mirrors”, Optical Fabrication and Testing Workshop Technical Notebook, OSA, Flamouth, MA Sept. 1980, pp 139-45. A revised reprint is available at https://www.optiper.com/alignment%20of%20off-axis%20conic%20mirrors.pdf.
3C. Ai, L. Shao and R. E. Parks, “Absolute testing of flats(II); using odd and even functions”, Optical Fabrication and Testing Workshop Technical Notebook, OSA, Boston, MA 1992.
4C. Ai and J. C. Wyant, “Absolute testing of flats using even and odd functions,” Appl. Opt. 32, 4698- (1993)
5Work performed in collaboration with Breault Research Organization, Tucson, AZ.
6R. J. Sarlot and D. W. McCarthy, “A Cryogenic, 1-5 Micron Atmospheric Dispersion Corrector for Astronomical Adaptive Optics,” in Current Developments in Lens Design and Optical Engineering II, R. E. Fischer, R. B. Johnson, W. J. Smith, eds., Proc. SPIE 72, 4441 (2001).